---
description:
  Learn how to create, manage, and use volumes instead of bind mounts for
  persisting data generated and used by Docker.
title: Volumes
weight: 10
keywords:
  docker compose volumes, docker volumes, docker compose volume, docker volume
  mount, docker mount volume, docker volume create, docker volume location
aliases:
  - /userguide/dockervolumes/
  - /engine/tutorials/dockervolumes/
  - /engine/userguide/dockervolumes/
  - /engine/admin/volumes/volumes/
  - /storage/volumes/
  - /engine/admin/volumes/backing-up/
---

Volumes are persistent data stores for containers, created and managed by
Docker. You can create a volume explicitly using the `docker volume create`
command, or Docker can create a volume during container or service creation.

When you create a volume, it's stored within a directory on the Docker
host. When you mount the volume into a container, this directory is what's
mounted into the container. This is similar to the way that bind mounts work,
except that volumes are managed by Docker and are isolated from the core
functionality of the host machine.

## When to use volumes

Volumes are the preferred mechanism for persisting data generated by and used
by Docker containers. While [bind mounts](bind-mounts.md) are dependent on the
directory structure and OS of the host machine, volumes are completely managed by
Docker. Volumes are a good choice for the following use cases:

- Volumes are easier to back up or migrate than bind mounts.
- You can manage volumes using Docker CLI commands or the Docker API.
- Volumes work on both Linux and Windows containers.
- Volumes can be more safely shared among multiple containers.
- New volumes can have their content pre-populated by a container or build.
- When your application requires high-performance I/O.

Volumes are not a good choice if you need to access the files from the host, as
the volume is completely managed by Docker. Use [bind mounts](bind-mounts.md)
if you need to access files or directories from both containers and the host.

Volumes are often a better choice than writing data directly to a container,
because a volume doesn't increase the size of the containers using it. Using a
volume is also faster; writing into a container's writable layer requires a
[storage driver](/manuals/engine/storage/drivers/_index.md) to manage the
filesystem. The storage driver provides a union filesystem, using the Linux
kernel. This extra abstraction reduces performance as compared to using
volumes, which write directly to the host filesystem.

If your container generates non-persistent state data, consider using a
[tmpfs mount](tmpfs.md) to avoid storing the data anywhere permanently, and to
increase the container's performance by avoiding writing into the container's
writable layer.

Volumes use `rprivate` (recursive private) bind propagation, and bind propagation isn't
configurable for volumes.

## A volume's lifecycle

A volume's contents exist outside the lifecycle of a given container. When a
container is destroyed, the writable layer is destroyed with it. Using a volume
ensures that the data is persisted even if the container using it is removed.

A given volume can be mounted into multiple containers simultaneously. When no
running container is using a volume, the volume is still available to Docker
and isn't removed automatically. You can remove unused volumes using `docker
volume prune`.

## Mounting a volume over existing data

If you mount a _non-empty volume_ into a directory in the container in which
files or directories exist, the pre-existing files are obscured by the mount.
This is similar to if you were to save files into `/mnt` on a Linux host, and
then mounted a USB drive into `/mnt`. The contents of `/mnt` would be obscured
by the contents of the USB drive until the USB drive was unmounted.

With containers, there's no straightforward way of removing a mount to reveal
the obscured files again. Your best option is to recreate the container without
the mount.

If you mount an _empty volume_ into a directory in the container in which files
or directories exist, these files or directories are propagated (copied) into
the volume by default. Similarly, if you start a container and specify a volume
which does not already exist, an empty volume is created for you. This is a
good way to pre-populate data that another container needs.

To prevent Docker from copying a container's pre-existing files into an empty
volume, use the `volume-nocopy` option, see [Options for --mount](#options-for---mount).

## Named and anonymous volumes

A volume may be named or anonymous. Anonymous volumes are given a random name
that's guaranteed to be unique within a given Docker host. Just like named
volumes, anonymous volumes persist even if you remove the container that uses
them, except if you use the `--rm` flag when creating the container, in which
case the anonymous volume associated with the container is destroyed. See
[Remove anonymous volumes](volumes.md#remove-anonymous-volumes).

If you create multiple containers consecutively that each use anonymous
volumes, each container creates its own volume. Anonymous volumes aren't reused
or shared between containers automatically. To share an anonymous volume
between two or more containers, you must mount the anonymous volume using the
random volume ID.

## Syntax

To mount a volume with the `docker run` command, you can use either the
`--mount` or `--volume` flag.

```console
$ docker run --mount type=volume,src=<volume-name>,dst=<mount-path>
$ docker run --volume <volume-name>:<mount-path>
```

In general, `--mount` is preferred. The main difference is that the `--mount`
flag is more explicit and supports all the available options.

You must use `--mount` if you want to:

- Specify [volume driver options](#use-a-volume-driver)
- Mount a [volume subdirectory](#mount-a-volume-subdirectory)
- Mount a volume into a Swarm service

### Options for --mount

The `--mount` flag consists of multiple key-value pairs, separated by commas
and each consisting of a `<key>=<value>` tuple. The order of the keys isn't
significant.

```console
$ docker run --mount type=volume[,src=<volume-name>],dst=<mount-path>[,<key>=<value>...]
```

Valid options for `--mount type=volume` include:

| Option                         | Description                                                                                                                                                                                                                     |
| ------------------------------ | ------------------------------------------------------------------------------------------------------------------------------------------------------------------------------------------------------------------------------- |
| `source`, `src`                | The source of the mount. For named volumes, this is the name of the volume. For anonymous volumes, this field is omitted.                                                                                                       |
| `destination`, `dst`, `target` | The path where the file or directory is mounted in the container.                                                                                                                                                               |
| `volume-subpath`               | A path to a subdirectory within the volume to mount into the container. The subdirectory must exist in the volume before the volume is mounted to a container. See [Mount a volume subdirectory](#mount-a-volume-subdirectory). |
| `readonly`, `ro`               | If present, causes the volume to be [mounted into the container as read-only](#use-a-read-only-volume).                                                                                                                         |
| `volume-nocopy`                | If present, data at the destination isn't copied into the volume if the volume is empty. By default, content at the target destination gets copied into a mounted volume if empty.                                              |
| `volume-opt`                   | Can be specified more than once, takes a key-value pair consisting of the option name and its value.                                                                                                                            |

```console {title="Example"}
$ docker run --mount type=volume,src=myvolume,dst=/data,ro,volume-subpath=/foo
```

### Options for --volume

The `--volume` or `-v` flag consists of three fields, separated by colon
characters (`:`). The fields must be in the correct order.

```console
$ docker run -v [<volume-name>:]<mount-path>[:opts]
```

In the case of named volumes, the first field is the name of the volume, and is
unique on a given host machine. For anonymous volumes, the first field is
omitted. The second field is the path where the file or directory is mounted in
the container.

The third field is optional, and is a comma-separated list of options. Valid
options for `--volume` with a data volume include:

| Option           | Description                                                                                                                                                                        |
| ---------------- | ---------------------------------------------------------------------------------------------------------------------------------------------------------------------------------- |
| `readonly`, `ro` | If present, causes the volume to be [mounted into the container as read-only](#use-a-read-only-volume).                                                                            |
| `volume-nocopy`  | If present, data at the destination isn't copied into the volume if the volume is empty. By default, content at the target destination gets copied into a mounted volume if empty. |

```console {title="Example"}
$ docker run -v myvolume:/data:ro
```

## Create and manage volumes

Unlike a bind mount, you can create and manage volumes outside the scope of any
container.

Create a volume:

```console
$ docker volume create my-vol
```

List volumes:

```console
$ docker volume ls

local               my-vol
```

Inspect a volume:

```console
$ docker volume inspect my-vol
[
    {
        "Driver": "local",
        "Labels": {},
        "Mountpoint": "/var/lib/docker/volumes/my-vol/_data",
        "Name": "my-vol",
        "Options": {},
        "Scope": "local"
    }
]
```

Remove a volume:

```console
$ docker volume rm my-vol
```

## Start a container with a volume

If you start a container with a volume that doesn't yet exist, Docker creates
the volume for you. The following example mounts the volume `myvol2` into
`/app/` in the container.

The following `-v` and `--mount` examples produce the same result. You can't
run them both unless you remove the `devtest` container and the `myvol2` volume
after running the first one.

{{< tabs >}}
{{< tab name="`--mount`" >}}

```console
$ docker run -d \
  --name devtest \
  --mount source=myvol2,target=/app \
  nginx:latest
```

{{< /tab >}}
{{< tab name="`-v`" >}}

```console
$ docker run -d \
  --name devtest \
  -v myvol2:/app \
  nginx:latest
```

{{< /tab >}}
{{< /tabs >}}

Use `docker inspect devtest` to verify that Docker created the volume and it mounted
correctly. Look for the `Mounts` section:

```json
"Mounts": [
    {
        "Type": "volume",
        "Name": "myvol2",
        "Source": "/var/lib/docker/volumes/myvol2/_data",
        "Destination": "/app",
        "Driver": "local",
        "Mode": "",
        "RW": true,
        "Propagation": ""
    }
],
```

This shows that the mount is a volume, it shows the correct source and
destination, and that the mount is read-write.

Stop the container and remove the volume. Note volume removal is a separate
step.

```console
$ docker container stop devtest

$ docker container rm devtest

$ docker volume rm myvol2
```

## Use a volume with Docker Compose

The following example shows a single Docker Compose service with a volume:

```yaml
services:
  frontend:
    image: node:lts
    volumes:
      - myapp:/home/node/app
volumes:
  myapp:
```

Running `docker compose up` for the first time creates a volume. Docker reuses the same volume when you run the command subsequently.

You can create a volume directly outside of Compose using `docker volume create` and
then reference it inside `compose.yaml` as follows:

```yaml
services:
  frontend:
    image: node:lts
    volumes:
      - myapp:/home/node/app
volumes:
  myapp:
    external: true
```

For more information about using volumes with Compose, refer to the
[Volumes](/reference/compose-file/volumes.md)
section in the Compose specification.

### Start a service with volumes

When you start a service and define a volume, each service container uses its own
local volume. None of the containers can share this data if you use the `local`
volume driver. However, some volume drivers do support shared storage.

The following example starts an `nginx` service with four replicas, each of which
uses a local volume called `myvol2`.

```console
$ docker service create -d \
  --replicas=4 \
  --name devtest-service \
  --mount source=myvol2,target=/app \
  nginx:latest
```

Use `docker service ps devtest-service` to verify that the service is running:

```console
$ docker service ps devtest-service

ID                  NAME                IMAGE               NODE                DESIRED STATE       CURRENT STATE            ERROR               PORTS
4d7oz1j85wwn        devtest-service.1   nginx:latest        moby                Running             Running 14 seconds ago
```

You can remove the service to stop the running tasks:

```console
$ docker service rm devtest-service
```

Removing the service doesn't remove any volumes created by the service.
Volume removal is a separate step.

### Populate a volume using a container

If you start a container which creates a new volume, and the container
has files or directories in the directory to be mounted such as `/app/`,
Docker copies the directory's contents into the volume. The container then
mounts and uses the volume, and other containers which use the volume also
have access to the pre-populated content.

To show this, the following example starts an `nginx` container and
populates the new volume `nginx-vol` with the contents of the container's
`/usr/share/nginx/html` directory. This is where Nginx stores its default HTML
content.

The `--mount` and `-v` examples have the same end result.

{{< tabs >}}
{{< tab name="`--mount`" >}}

```console
$ docker run -d \
  --name=nginxtest \
  --mount source=nginx-vol,destination=/usr/share/nginx/html \
  nginx:latest
```

{{< /tab >}}
{{< tab name="`-v`" >}}

```console
$ docker run -d \
  --name=nginxtest \
  -v nginx-vol:/usr/share/nginx/html \
  nginx:latest
```

{{< /tab >}}
{{< /tabs >}}

After running either of these examples, run the following commands to clean up
the containers and volumes. Note volume removal is a separate step.

```console
$ docker container stop nginxtest

$ docker container rm nginxtest

$ docker volume rm nginx-vol
```

## Use a read-only volume

For some development applications, the container needs to write into the bind
mount so that changes are propagated back to the Docker host. At other times,
the container only needs read access to the data. Multiple
containers can mount the same volume. You can simultaneously mount a
single volume as `read-write` for some containers and as `read-only` for others.

The following example changes the previous one. It mounts the directory as a read-only
volume, by adding `ro` to the (empty by default) list of options, after the
mount point within the container. Where multiple options are present, you can separate
them using commas.

The `--mount` and `-v` examples have the same result.

{{< tabs >}}
{{< tab name="`--mount`" >}}

```console
$ docker run -d \
  --name=nginxtest \
  --mount source=nginx-vol,destination=/usr/share/nginx/html,readonly \
  nginx:latest
```

{{< /tab >}}
{{< tab name="`-v`" >}}

```console
$ docker run -d \
  --name=nginxtest \
  -v nginx-vol:/usr/share/nginx/html:ro \
  nginx:latest
```

{{< /tab >}}
{{< /tabs >}}

Use `docker inspect nginxtest` to verify that Docker created the read-only mount
correctly. Look for the `Mounts` section:

```json
"Mounts": [
    {
        "Type": "volume",
        "Name": "nginx-vol",
        "Source": "/var/lib/docker/volumes/nginx-vol/_data",
        "Destination": "/usr/share/nginx/html",
        "Driver": "local",
        "Mode": "",
        "RW": false,
        "Propagation": ""
    }
],
```

Stop and remove the container, and remove the volume. Volume removal is a
separate step.

```console
$ docker container stop nginxtest

$ docker container rm nginxtest

$ docker volume rm nginx-vol
```

## Mount a volume subdirectory

When you mount a volume to a container, you can specify a subdirectory of the
volume to use, with the `volume-subpath` parameter for the `--mount` flag. The
subdirectory that you specify must exist in the volume before you attempt to
mount it into a container; if it doesn't exist, the mount fails.

Specifying `volume-subpath` is useful if you only want to share a specific
portion of a volume with a container. Say for example that you have multiple
containers running and you want to store logs from each container in a shared
volume. You can create a subdirectory for each container in the shared volume,
and mount the subdirectory to the container.

The following example creates a `logs` volume and initiates the subdirectories
`app1` and `app2` in the volume. It then starts two containers and mounts one
of the subdirectories of the `logs` volume to each container. This example
assumes that the processes in the containers write their logs to
`/var/log/app1` and `/var/log/app2`.

```console
$ docker volume create logs
$ docker run --rm \
  --mount src=logs,dst=/logs \
  alpine mkdir -p /logs/app1 /logs/app2
$ docker run -d \
  --name=app1 \
  --mount src=logs,dst=/var/log/app1,volume-subpath=app1 \
  app1:latest
$ docker run -d \
  --name=app2 \
  --mount src=logs,dst=/var/log/app2,volume-subpath=app2 \
  app2:latest
```

With this setup, the containers write their logs to separate subdirectories of
the `logs` volume. The containers can't access the other container's logs.

## Share data between machines

When building fault-tolerant applications, you may need to configure multiple
replicas of the same service to have access to the same files.
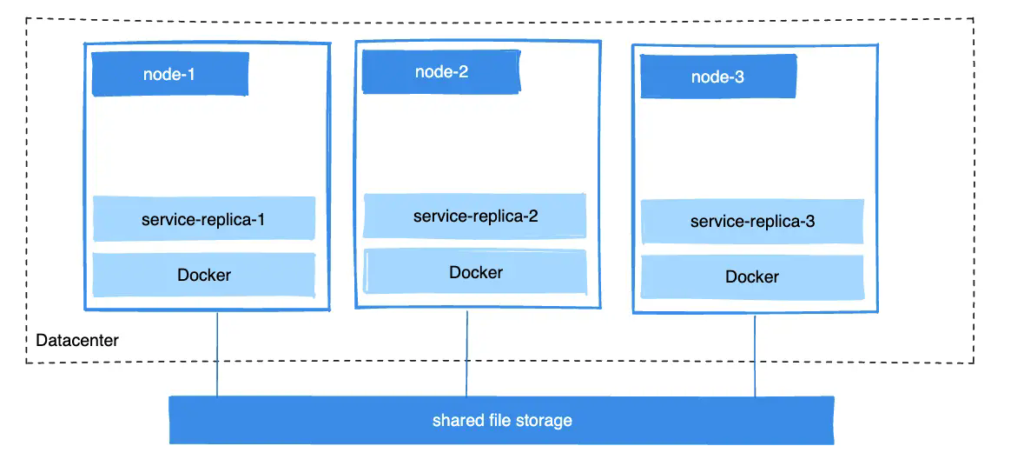
There are several ways to achieve this when developing your applications.
One is to add logic to your application to store files on a cloud object
storage system like Amazon S3. Another is to create volumes with a driver that
supports writing files to an external storage system like NFS or Amazon S3.

Volume drivers let you abstract the underlying storage system from the
application logic. For example, if your services use a volume with an NFS
driver, you can update the services to use a different driver. For example, to
store data in the cloud, without changing the application logic.

## Use a volume driver

When you create a volume using `docker volume create`, or when you start a
container which uses a not-yet-created volume, you can specify a volume driver.
The following examples use the `rclone/docker-volume-rclone` volume driver, first when creating
a standalone volume, and then when starting a container which creates a new
volume.

> [!NOTE]
>
> If your volume driver accepts a comma-separated list as an option,
> you must escape the value from the outer CSV parser. To escape a `volume-opt`,
> surround it with double quotes (`"`) and surround the entire mount parameter
> with single quotes (`'`).
>
> For example, the `local` driver accepts mount options as a comma-separated
> list in the `o` parameter. This example shows the correct way to escape the list.
>
> ```console
> $ docker service create \
>  --mount 'type=volume,src=<VOLUME-NAME>,dst=<CONTAINER-PATH>,volume-driver=local,volume-opt=type=nfs,volume-opt=device=<nfs-server>:<nfs-path>,"volume-opt=o=addr=<nfs-address>,vers=4,soft,timeo=180,bg,tcp,rw"'
>  --name myservice \
>  <IMAGE>
> ```

### Initial setup

The following example assumes that you have two nodes, the first of which is a Docker
host and can connect to the second node using SSH.

On the Docker host, install the `rclone/docker-volume-rclone` plugin:

```console
$ docker plugin install --grant-all-permissions rclone/docker-volume-rclone --aliases rclone
```

### Create a volume using a volume driver

This example mounts the `/remote` directory on host `1.2.3.4` into a
volume named `rclonevolume`. Each volume driver may have zero or more
configurable options, you specify each of them using an `-o` flag.

```console
$ docker volume create \
  -d rclone \
  --name rclonevolume \
  -o type=sftp \
  -o path=remote \
  -o sftp-host=1.2.3.4 \
  -o sftp-user=user \
  -o "sftp-password=$(cat file_containing_password_for_remote_host)"
```

This volume can now be mounted into containers.

### Start a container which creates a volume using a volume driver

> [!NOTE]
>
> If the volume driver requires you to pass any options,
> you must use the `--mount` flag to mount the volume, and not `-v`.

```console
$ docker run -d \
  --name rclone-container \
  --mount type=volume,volume-driver=rclone,src=rclonevolume,target=/app,volume-opt=type=sftp,volume-opt=path=remote, volume-opt=sftp-host=1.2.3.4,volume-opt=sftp-user=user,volume-opt=-o "sftp-password=$(cat file_containing_password_for_remote_host)" \
  nginx:latest
```

### Create a service which creates an NFS volume

The following example shows how you can create an NFS volume when creating a service.
It uses `10.0.0.10` as the NFS server and `/var/docker-nfs` as the exported directory on the NFS server.
Note that the volume driver specified is `local`.

#### NFSv3

```console
$ docker service create -d \
  --name nfs-service \
  --mount 'type=volume,source=nfsvolume,target=/app,volume-driver=local,volume-opt=type=nfs,volume-opt=device=:/var/docker-nfs,volume-opt=o=addr=10.0.0.10' \
  nginx:latest
```

#### NFSv4

```console
$ docker service create -d \
    --name nfs-service \
    --mount 'type=volume,source=nfsvolume,target=/app,volume-driver=local,volume-opt=type=nfs,volume-opt=device=:/var/docker-nfs,"volume-opt=o=addr=10.0.0.10,rw,nfsvers=4,async"' \
    nginx:latest
```

### Create CIFS/Samba volumes

You can mount a Samba share directly in Docker without configuring a mount point on your host.

```console
$ docker volume create \
	--driver local \
	--opt type=cifs \
	--opt device=//uxxxxx.your-server.de/backup \
	--opt o=addr=uxxxxx.your-server.de,username=uxxxxxxx,password=*****,file_mode=0777,dir_mode=0777 \
	--name cif-volume
```

The `addr` option is required if you specify a hostname instead of an IP.
This lets Docker perform the hostname lookup.

### Block storage devices

You can mount a block storage device, such as an external drive or a drive partition, to a container.
The following example shows how to create and use a file as a block storage device,
and how to mount the block device as a container volume.

> [!IMPORTANT]
>
> The following procedure is only an example.
> The solution illustrated here isn't recommended as a general practice.
> Don't attempt this approach unless you're confident about what you're doing.

#### How mounting block devices works

Under the hood, the `--mount` flag using the `local` storage driver invokes the
Linux `mount` syscall and forwards the options you pass to it unaltered.
Docker doesn't implement any additional functionality on top of the native mount features supported by the Linux kernel.

If you're familiar with the
[Linux `mount` command](https://man7.org/linux/man-pages/man8/mount.8.html),
you can think of the `--mount` options as forwarded to the `mount` command in the following manner:

```console
$ mount -t <mount.volume-opt.type> <mount.volume-opt.device> <mount.dst> -o <mount.volume-opts.o>
```

To explain this further, consider the following `mount` command example.
This command mounts the `/dev/loop5` device to the path `/external-drive` on the system.

```console
$ mount -t ext4 /dev/loop5 /external-drive
```

The following `docker run` command achieves a similar result, from the point of view of the container being run.
Running a container with this `--mount` option sets up the mount in the same way as if you had executed the
`mount` command from the previous example.

```console
$ docker run \
  --mount='type=volume,dst=/external-drive,volume-driver=local,volume-opt=device=/dev/loop5,volume-opt=type=ext4'
```

You can't run the `mount` command inside the container directly,
because the container is unable to access the `/dev/loop5` device.
That's why the `docker run` command uses the `--mount` option.

#### Example: Mounting a block device in a container

The following steps create an `ext4` filesystem and mounts it into a container.
The filesystem support of your system depends on the version of the Linux kernel you are using.

1. Create a file and allocate some space to it:

   ```console
   $ fallocate -l 1G disk.raw
   ```

2. Build a filesystem onto the `disk.raw` file:

   ```console
   $ mkfs.ext4 disk.raw
   ```

3. Create a loop device:

   ```console
   $ losetup -f --show disk.raw
   /dev/loop5
   ```

   > [!NOTE]
   >
   > `losetup` creates an ephemeral loop device that's removed after
   > system reboot, or manually removed with `losetup -d`.

4. Run a container that mounts the loop device as a volume:

   ```console
   $ docker run -it --rm \
     --mount='type=volume,dst=/external-drive,volume-driver=local,volume-opt=device=/dev/loop5,volume-opt=type=ext4' \
     ubuntu bash
   ```

   When the container starts, the path `/external-drive` mounts the
   `disk.raw` file from the host filesystem as a block device.

5. When you're done, and the device is unmounted from the container,
   detach the loop device to remove the device from the host system:

   ```console
   $ losetup -d /dev/loop5
   ```

## Back up, restore, or migrate data volumes

Volumes are useful for backups, restores, and migrations.
Use the `--volumes-from` flag to create a new container that mounts that volume.

### Back up a volume

For example, create a new container named `dbstore`:

```console
$ docker run -v /dbdata --name dbstore ubuntu /bin/bash
```

In the next command:

- Launch a new container and mount the volume from the `dbstore` container
- Mount a local host directory as `/backup`
- Pass a command that tars the contents of the `dbdata` volume to a `backup.tar` file inside the `/backup` directory.

```console
$ docker run --rm --volumes-from dbstore -v $(pwd):/backup ubuntu tar cvf /backup/backup.tar /dbdata
```

When the command completes and the container stops, it creates a backup of
the `dbdata` volume.

### Restore volume from a backup

With the backup just created, you can restore it to the same container,
or to another container that you created elsewhere.

For example, create a new container named `dbstore2`:

```console
$ docker run -v /dbdata --name dbstore2 ubuntu /bin/bash
```

Then, un-tar the backup file in the new container’s data volume:

```console
$ docker run --rm --volumes-from dbstore2 -v $(pwd):/backup ubuntu bash -c "cd /dbdata && tar xvf /backup/backup.tar --strip 1"
```

You can use these techniques to automate backup, migration, and restore
testing using your preferred tools.

## Remove volumes

A Docker data volume persists after you delete a container. There are two types
of volumes to consider:

- Named volumes have a specific source from outside the container, for example, `awesome:/bar`.
- Anonymous volumes have no specific source. Therefore, when the container is deleted, you can instruct the Docker Engine daemon to remove them.

### Remove anonymous volumes

To automatically remove anonymous volumes, use the `--rm` option. For example,
this command creates an anonymous `/foo` volume. When you remove the container,
the Docker Engine removes the `/foo` volume but not the `awesome` volume.

```console
$ docker run --rm -v /foo -v awesome:/bar busybox top
```

> [!NOTE]
>
> If another container binds the volumes with
> `--volumes-from`, the volume definitions are _copied_ and the
> anonymous volume also stays after the first container is removed.

### Remove all volumes

To remove all unused volumes and free up space:

```console
$ docker volume prune
```

## Next steps

- Learn about [bind mounts](bind-mounts.md).
- Learn about [tmpfs mounts](tmpfs.md).
- Learn about [storage drivers](/engine/storage/drivers/).
- Learn about [third-party volume driver plugins](/engine/extend/legacy_plugins/).