$ docker container stop nginxtest
$ docker container rm nginxtest
$ docker volume rm nginx-vol
```
## Use a read-only volume
For some development applications, the container needs to write into the bind
mount so that changes are propagated back to the Docker host. At other times,
the container only needs read access to the data. Multiple
containers can mount the same volume. You can simultaneously mount a
single volume as `read-write` for some containers and as `read-only` for others.
The following example changes the previous one. It mounts the directory as a read-only
volume, by adding `ro` to the (empty by default) list of options, after the
mount point within the container. Where multiple options are present, you can separate
them using commas.
The `--mount` and `-v` examples have the same result.
{{< tabs >}}
{{< tab name="`--mount`" >}}
```console
$ docker run -d \
--name=nginxtest \
--mount source=nginx-vol,destination=/usr/share/nginx/html,readonly \
nginx:latest
```
{{< /tab >}}
{{< tab name="`-v`" >}}
```console
$ docker run -d \
--name=nginxtest \
-v nginx-vol:/usr/share/nginx/html:ro \
nginx:latest
```
{{< /tab >}}
{{< /tabs >}}
Use `docker inspect nginxtest` to verify that Docker created the read-only mount
correctly. Look for the `Mounts` section:
```json
"Mounts": [
{
"Type": "volume",
"Name": "nginx-vol",
"Source": "/var/lib/docker/volumes/nginx-vol/_data",
"Destination": "/usr/share/nginx/html",
"Driver": "local",
"Mode": "",
"RW": false,
"Propagation": ""
}
],
```
Stop and remove the container, and remove the volume. Volume removal is a
separate step.
```console
$ docker container stop nginxtest
$ docker container rm nginxtest
$ docker volume rm nginx-vol
```
## Mount a volume subdirectory
When you mount a volume to a container, you can specify a subdirectory of the
volume to use, with the `volume-subpath` parameter for the `--mount` flag. The
subdirectory that you specify must exist in the volume before you attempt to
mount it into a container; if it doesn't exist, the mount fails.
Specifying `volume-subpath` is useful if you only want to share a specific
portion of a volume with a container. Say for example that you have multiple
containers running and you want to store logs from each container in a shared
volume. You can create a subdirectory for each container in the shared volume,
and mount the subdirectory to the container.
The following example creates a `logs` volume and initiates the subdirectories
`app1` and `app2` in the volume. It then starts two containers and mounts one
of the subdirectories of the `logs` volume to each container. This example
assumes that the processes in the containers write their logs to
`/var/log/app1` and `/var/log/app2`.
```console
$ docker volume create logs
$ docker run --rm \
--mount src=logs,dst=/logs \
alpine mkdir -p /logs/app1 /logs/app2
$ docker run -d \
--name=app1 \
--mount src=logs,dst=/var/log/app1,volume-subpath=app1 \
app1:latest
$ docker run -d \
--name=app2 \
--mount src=logs,dst=/var/log/app2,volume-subpath=app2 \
app2:latest
```
With this setup, the containers write their logs to separate subdirectories of
the `logs` volume. The containers can't access the other container's logs.
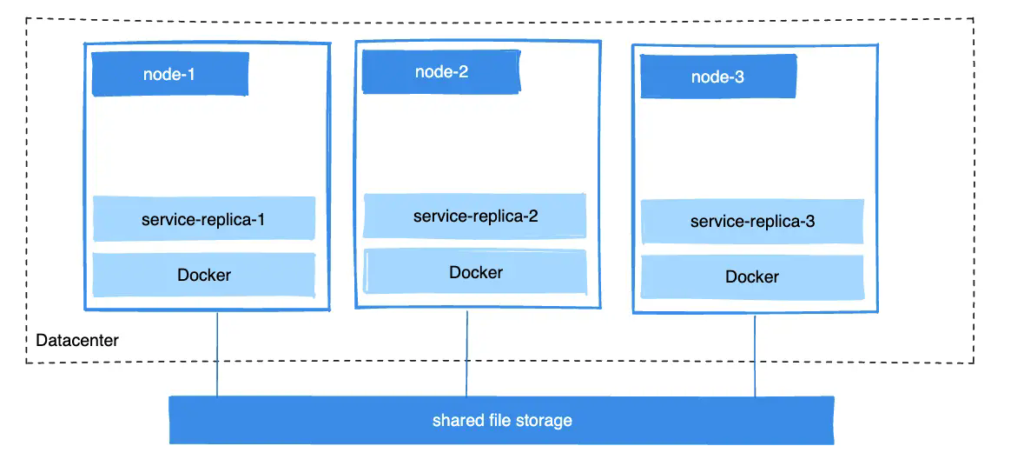
## Share data between machines
When building fault-tolerant applications, you may need to configure multiple
replicas of the same service to have access to the same files.