FROM eclipse-temurin:21-jre-jammy AS final
ARG UID=10001
RUN adduser \
--disabled-password \
--gecos "" \
--home "/nonexistent" \
--shell "/sbin/nologin" \
--no-create-home \
--uid "${UID}" \
appuser
USER appuser
COPY --from=extract build/target/extracted/dependencies/ ./
COPY --from=extract build/target/extracted/spring-boot-loader/ ./
COPY --from=extract build/target/extracted/snapshot-dependencies/ ./
COPY --from=extract build/target/extracted/application/ ./
EXPOSE 8080
ENTRYPOINT [ "java", "-Dspring.profiles.active=postgres", "org.springframework.boot.loader.launch.JarLauncher" ]
```
Save and close the `Dockerfile`.
In the `Dockerfile` you added a new stage labeled `development` based on the `extract` stage. In this stage, you copy the extracted files to a common directory, then run a command to start the application. In the command, you expose port 8000 and declare the debug configuration for the JVM so that you can attach a debugger.
## Use Compose to develop locally
The current Compose file doesn't start your development container. To do that, you must update your Compose file to target the development stage. Also, update the port mapping of the server service to provide access for the debugger.
Open the `docker-compose.yaml` and add the following instructions into the file.
```yaml {hl_lines=["5","8"]}
services:
server:
build:
context: .
target: development
ports:
- 8080:8080
- 8000:8000
depends_on:
db:
condition: service_healthy
environment:
- POSTGRES_URL=jdbc:postgresql://db:5432/petclinic
db:
image: postgres
restart: always
volumes:
- db-data:/var/lib/postgresql/data
environment:
- POSTGRES_DB=petclinic
- POSTGRES_USER=petclinic
- POSTGRES_PASSWORD=petclinic
ports:
- 5432:5432
healthcheck:
test: ["CMD", "pg_isready", "-U", "petclinic"]
interval: 10s
timeout: 5s
retries: 5
volumes:
db-data:
```
Now, start your application and to confirm that it's running.
```console
$ docker compose up --build
```
Finally, test your API endpoint. Run the following curl command:
```console
$ curl --request GET \
--url http://localhost:8080/vets \
--header 'content-type: application/json'
```
You should receive the following response:
```json
{
"vetList": [
{
"id": 1,
"firstName": "James",
"lastName": "Carter",
"specialties": [],
"nrOfSpecialties": 0,
"new": false
},
{
"id": 2,
"firstName": "Helen",
"lastName": "Leary",
"specialties": [{ "id": 1, "name": "radiology", "new": false }],
"nrOfSpecialties": 1,
"new": false
},
{
"id": 3,
"firstName": "Linda",
"lastName": "Douglas",
"specialties": [
{ "id": 3, "name": "dentistry", "new": false },
{ "id": 2, "name": "surgery", "new": false }
],
"nrOfSpecialties": 2,
"new": false
},
{
"id": 4,
"firstName": "Rafael",
"lastName": "Ortega",
"specialties": [{ "id": 2, "name": "surgery", "new": false }],
"nrOfSpecialties": 1,
"new": false
},
{
"id": 5,
"firstName": "Henry",
"lastName": "Stevens",
"specialties": [{ "id": 1, "name": "radiology", "new": false }],
"nrOfSpecialties": 1,
"new": false
},
{
"id": 6,
"firstName": "Sharon",
"lastName": "Jenkins",
"specialties": [],
"nrOfSpecialties": 0,
"new": false
}
]
}
```
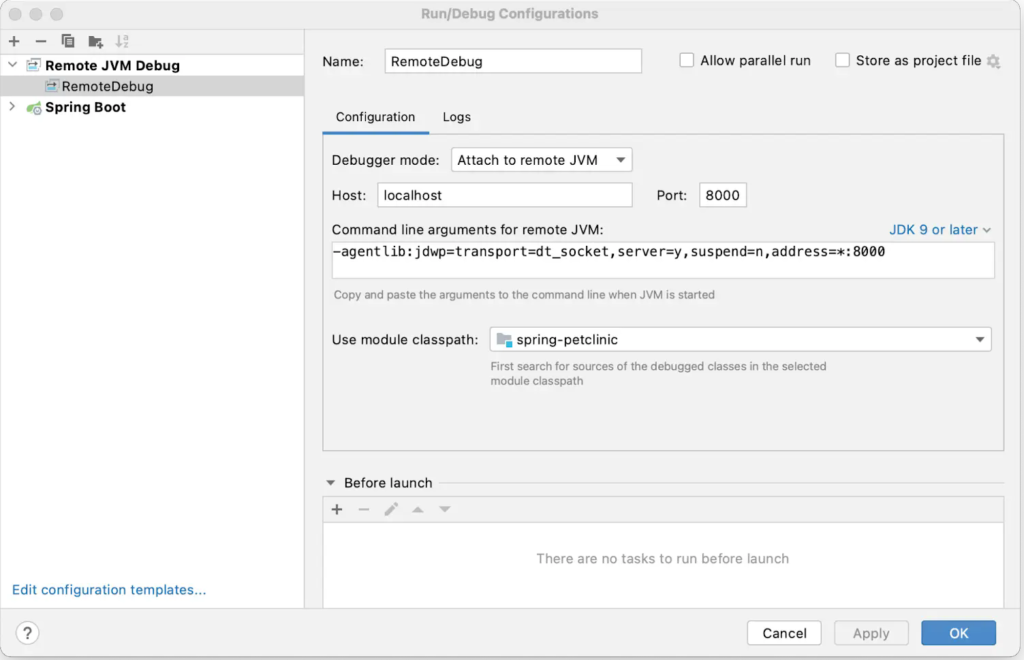
## Connect a Debugger
You’ll use the debugger that comes with the IntelliJ IDEA. You can use the community version of this IDE. Open your project in IntelliJ IDEA, go to the **Run** menu, and then **Edit Configuration**. Add a new Remote JVM Debug configuration similar to the following: