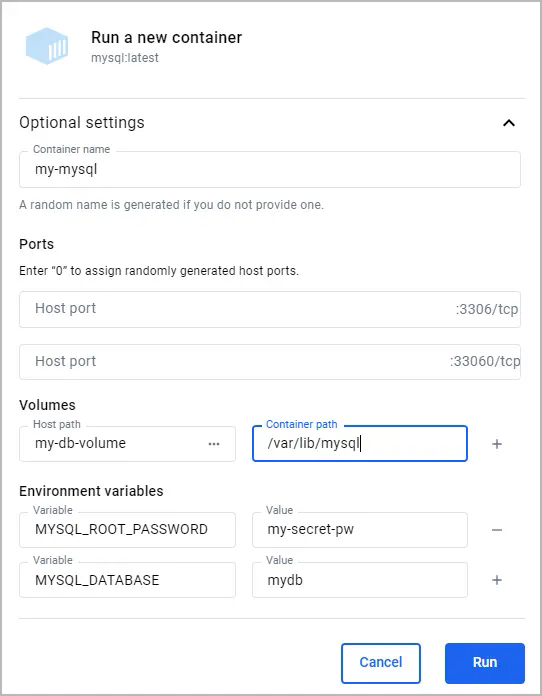
Here, the name of the volume is `my-db-volume` and it is mounted in the
container at `/var/lib/mysql`.
6. Select `Run`.
2. Create some data in the database.
1. In the **Containers** view, next to your container select the **Show
container actions** icon, and then select **Open in terminal**.
2. Run the following command in the container's terminal to add a table.
```console
# mysql -u root -pmy-secret-pw -e "CREATE TABLE IF NOT EXISTS mydb.mytable (column_name VARCHAR(255)); INSERT INTO mydb.mytable (column_name) VALUES ('value');"
```
This command uses the `mysql` tool in the container to create a table
named `mytable` with a column named `column_name`, and finally inserts a
value of value`.
3. In the **Containers** view, select the **Delete** icon next to your
container, and then select **Delete forever**. Without a volume, the table
you created would be lost when deleting the container.
4. Run a container with a volume attached.
1. In the Docker Desktop Dashboard, select the global search at the top of the window.
2. Specify `mysql` in the search box, and select the **Images** tab if not
already selected.
3. Hover over the **mysql** image and select **Run**.
The **Run a new container** modal appears.
4. Expand **Optional settings**.
5. In the optional settings, specify the following:
- **Container name**: `my-mysql`
- **Environment variables**:
- `MYSQL_ROOT_PASSWORD`:`my-secret-pw`
- `MYSQL_DATABASE`:`mydb`
- **Volumes**:
- `my-db-volume`:`/var/lib/mysql`

6. Select `Run`.
5. Verify that the table you created still exists.
1. In the **Containers** view, next to your container select the **Show
container actions** icon, and then select **Open in terminal**.
2. Run the following command in the container's terminal to verify that table