---
description: Learn how to run, connect to, and persist data in a local containerized database.
keywords: database, mysql
title: Use containerized databases
summary: |
Learn how to effectively run and manage databases as containers.
tags: [databases]
aliases:
- /guides/use-case/databases/
params:
time: 20 minutes
---
Using a local containerized database offers flexibility and ease of setup,
letting you mirror production environments closely without the overhead of
traditional database installations. Docker simplifies this process, enabling you
to deploy, manage, and scale databases in isolated containers with just a few
commands.
In this guide, you'll learn how to:
- Run a local containerized database
- Access the shell of a containerized database
- Connect to a containerized database from your host
- Connect to a containerized database from another container
- Persist database data in a volume
- Build a customized database image
- Use Docker Compose to run a database
This guide uses the MySQL image for examples, but the concepts can be applied to other database images.
## Prerequisites
To follow along with this guide, you must have Docker installed. To install Docker, see [Get Docker](/get-started/get-docker.md).
## Run a local containerized database
Most popular database systems, including MySQL, PostgreSQL, and MongoDB, have a
Docker Official Image available on Docker Hub. These images are a curated set
images that follow best practices, ensuring that you have access to the latest
features and security updates. To get started, visit
[Docker Hub](https://hub.docker.com) and search for the database you're
interested in. Each image's page provides detailed instructions on how to run
the container, customize your setup, and configure the database according to
your needs. For more information about the MySQL image used in this guide, see the Docker Hub [MySQL image](https://hub.docker.com/_/mysql) page.
To run a database container, you can use either the Docker Desktop GUI or
CLI.
{{< tabs group="ui" >}}
{{< tab name="CLI" >}}
To run a container using the CLI, run the following command in a terminal:
```console
$ docker run --name my-mysql -e MYSQL_ROOT_PASSWORD=my-secret-pw -e MYSQL_DATABASE=mydb -d mysql:latest
```
In this command:
- `--name my-mysql` assigns the name my-mysql to your container for easier
reference.
- `-e MYSQL_ROOT_PASSWORD=my-secret-pw` sets the root password for MySQL to
my-secret-pw. Replace my-secret-pw with a secure password of your choice.
- `-e MYSQL_DATABASE=mydb` optionally creates a database named mydb. You can
change mydb to your desired database name.
- `-d` runs the container in detached mode, meaning it runs in the background.
- `mysql:latest` specifies that you want to use the latest version of the MySQL
image.
To verify that you container is running, run `docker ps` in a terminal
{{< /tab >}}
{{< tab name="GUI" >}}
To run a container using the GUI:
1. In the Docker Desktop Dashboard, select the global search at the top of the window.
2. Specify `mysql` in the search box, and select the `Images` tab if not already
selected.
3. Hover over the `mysql` image and select `Run`.
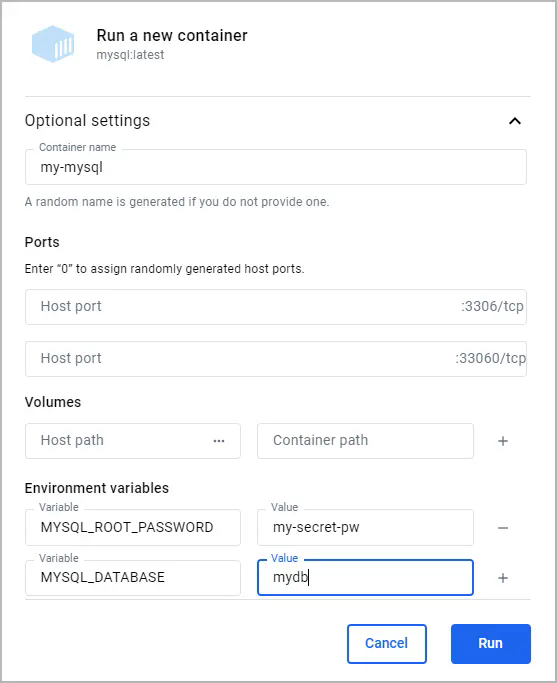
The **Run a new container** modal appears.
4. Expand **Optional settings**.
5. In the optional settings, specify the following:
- **Container name**: `my-mysql`
- **Environment variables**:
- `MYSQL_ROOT_PASSWORD`:`my-secret-pw`
- `MYSQL_DATABASE`:`mydb`